|
Size: 868
Comment:
|
Size: 1604
Comment:
|
| Deletions are marked like this. | Additions are marked like this. |
| Line 9: | Line 9: |
| 2. Click Add | '''2)''' Click Add. |
| Line 11: | Line 11: |
| 3. select Enter URI, enter ipp://ilhp500c.stanford.edu and click Forward. | {{attachment:02.png}} |
| Line 13: | Line 13: |
| 4. Click Select printer from database, choose HP and click Forward. | '''3)''' Select Enter URI, enter ipp://ilhp500c.stanford.edu and click Forward. |
| Line 15: | Line 15: |
| 5. From the Models list select LaserJet 500 color M551 and select the HP LaserJet 500 color M551 PostScript from the Drivers list. Click Forward. | {{attachment:03.png}} |
| Line 17: | Line 17: |
| '''4)''' Select the option Select printer from database, choose HP and click Forward. | |
| Line 18: | Line 19: |
| 6. Select the Duplex Unit, 1024 MB RAM and Printer disk and continue by clicking FOrward. | {{attachment:04.png}} |
| Line 20: | Line 21: |
| 7. Enter ilhp500c for the short name, HP LaserJet 500 color M551 for the description and Gates 427 as the location (feel free to enter your own values that will help you identify the printer). Click Apply once you are done. | '''5)''' Select '''LaserJet 500 color M551''' from the list of models on the left and select '''HP LaserJet 500 color M551 PostScript''' from the Drivers list on the right. Click Forward. |
| Line 22: | Line 23: |
| You are done! | {{attachment:05.png}} '''6)''' Make sure that Duplex Unit and Printer disk boxes are checked. Select 1024 MB RAM and continue by clicking Forward. {{attachment:06.png}} '''7)''' Enter '''ilhp500c''' for the short name, '''HP LaserJet 500 color M551''' for the description and '''Gates 427''' as the location. Feel free to enter your own values that will help you identify the printer in the future. Click Apply to proceed. {{attachment:07.png}} '''8)''' Right click the ilhp500c printer in the printing application and select Properties. {{attachment:08.png}} '''9)''' Select Printer Options from the list on the left and change the selection Two-sided to Long-Edge Binding to enable duplex printing by default. {{attachment:09.png}} '''10)''' Congratulations the printer is now installed and ready for use. Make sure you select printing on both sides when you send your documents to the printer. |
Installing HP LaserJet 500 color on Ubuntu
This document contains the steps necessary to install the printer on Ubuntu GNU/Linux 12.04.
1) Open the printing application.
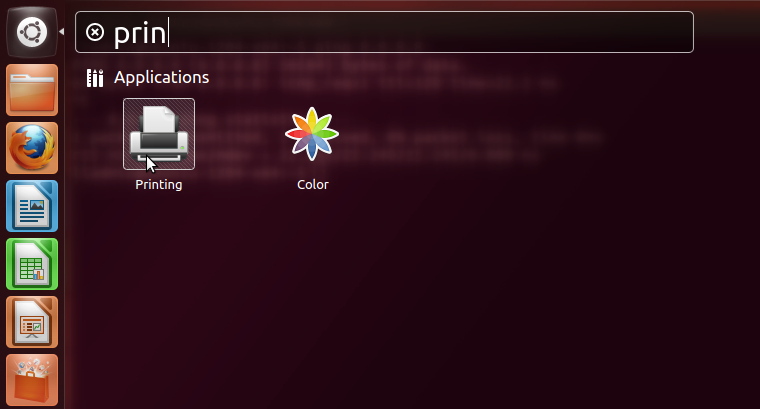
2) Click Add.
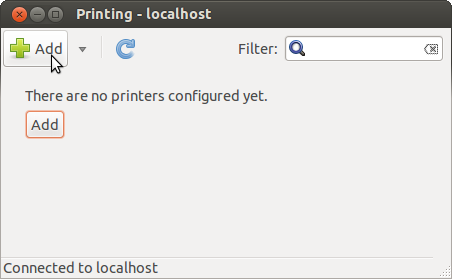
3) Select Enter URI, enter ipp://ilhp500c.stanford.edu and click Forward.
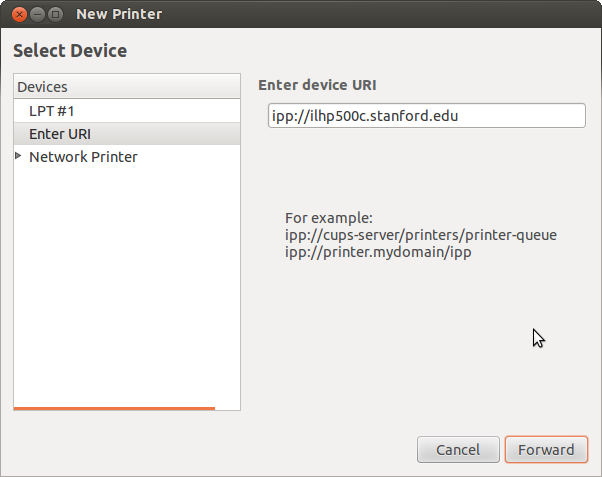
4) Select the option Select printer from database, choose HP and click Forward.
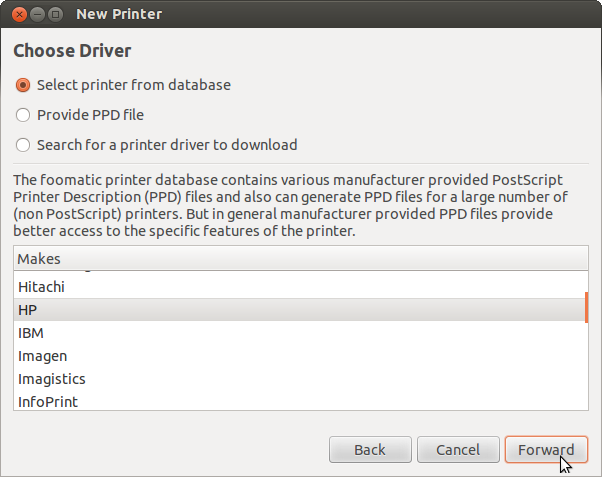
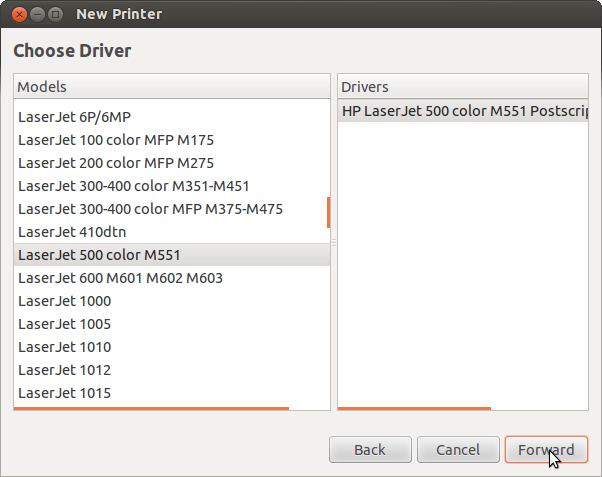
5) Select LaserJet 500 color M551 from the list of models on the left and select HP LaserJet 500 color M551 PostScript from the Drivers list on the right. Click Forward.
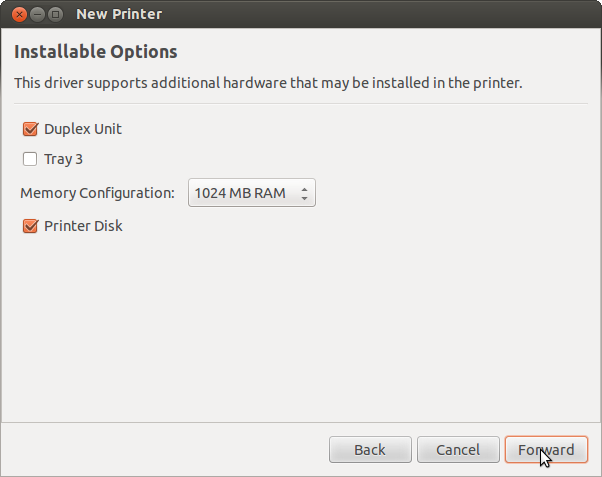
6) Make sure that Duplex Unit and Printer disk boxes are checked. Select 1024 MB RAM and continue by clicking Forward.
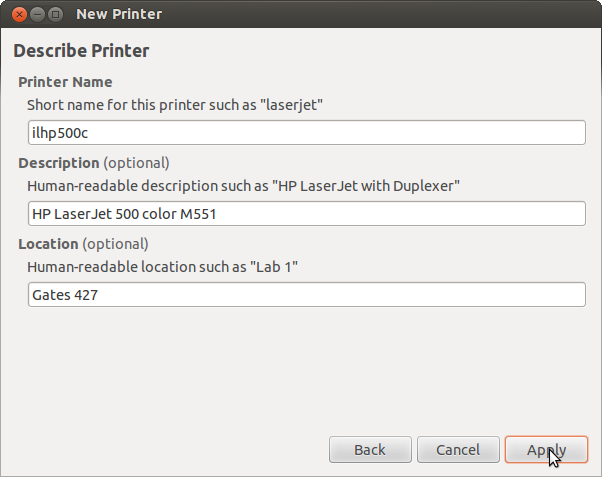
7) Enter ilhp500c for the short name, HP LaserJet 500 color M551 for the description and Gates 427 as the location. Feel free to enter your own values that will help you identify the printer in the future. Click Apply to proceed.
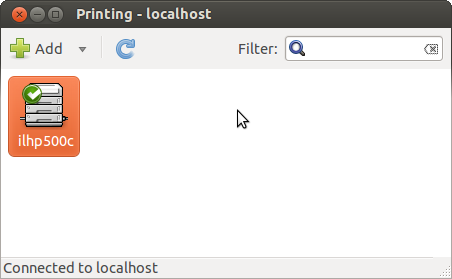
8) Right click the ilhp500c printer in the printing application and select Properties.
9) Select Printer Options from the list on the left and change the selection Two-sided to Long-Edge Binding to enable duplex printing by default.
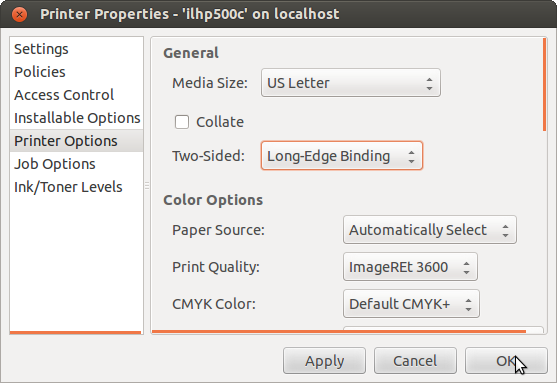
10) Congratulations the printer is now installed and ready for use. Make sure you select printing on both sides when you send your documents to the printer.
 Infolab wiki