|
Size: 1656
Comment:
|
Size: 2755
Comment:
|
| Deletions are marked like this. | Additions are marked like this. |
| Line 3: | Line 3: |
| This document contains the steps necessary to install the printer on Windows 7. | This howto will show you how to set up our black/white printer on Windows 7 in ''only'' 16 very simple steps. |
| Line 7: | Line 7: |
| Grab the drivers from the link below and unzip them into a temporary folder on your computer: | Grab the drivers from the link below and unzip them into a temporary folder on your computer. |
| Line 11: | Line 11: |
| '''2)''' Open the Devices and Printers pane in Control Panel. | '''...2...''' Open the Control Panel and click on the ''View devices and printers'' link. Or open ''Devices and Printers'' directly from what used to be called a start menu. {{attachment:01.png}} '''...3...''' Click the ''Add a printer'' button. |
| Line 15: | Line 23: |
| '''3)''' Click the Add a printer button. In the presented dialog select Add a network, wireless or Bluetooth printer. | '''...4...''' Select ''Add a local printer'' and click ''Next''. |
| Line 19: | Line 30: |
| '''4)''' Without waiting for Windows to complete its search, you can click on The printer that I want isn't listed. | '''...5...''' Select the option ''Create a new port''. Choose ''Standard TCP/IP Port'' from the ''Type of port'' combo box. |
| Line 23: | Line 36: |
| '''5)''' Click Select a shared printer by name and enter the following URI: http://ilhp600.stanford.edu:631/printers/ilhp600. Click on the Next button to proceed. | '''...6...''' |
| Line 25: | Line 38: |
| {{attachment:05.png}} | Enter ''ilp.stanford.edu'' in both the ''Hostname or IP address'' field and the ''Port name'' filed. Make sure the check box ''Query the printer automatically...'' is checked. |
| Line 27: | Line 40: |
| '''6)''' Click on the Have disk ... button. | {{attachment:05.png}} |
| Line 29: | Line 42: |
| {{attachment:06.png}} | '''...7...''' |
| Line 31: | Line 44: |
| '''7)''' Browse to the directory where the files you have unzipped in step 1) are. Click OK to continue. | Select the option ''Standard'' for the ''Device Type'' and make sure that ''Hewlett Packard Jet Direct'' is selected in the combo box. {{attachment:06.png}} '''...8...''' Click on the ''Have Disk...''' button. |
| Line 35: | Line 54: |
| '''8)''' Select '''HP !LaserJet 600 M601 M602 M603 PCL6''' from the list and click OK to continue. | '''...9...''' Click on the ''Browse...''' button. |
| Line 39: | Line 60: |
| '''9)''' Sorry, you cannot change the somewhat long printer name. Click Next. | '''...10...''' Navigate to the folder that you have unzipped the driver files to (#1) and click on the ''Open'' button. |
| Line 43: | Line 66: |
| '''10)''' You may wish to check the Set as the default printer setting as you will probably use this printer the most. Click Finish to complete the installation. | '''...11...''' Select ''HP LaserJet 600 M601 M602 M603 PCL6'' from the list and click ''Next''. |
| Line 47: | Line 72: |
| '''11)''' Congratulations the printer is now installed and ready for use. Make sure you select two-sided printing whenever you can to save the supplies and the environment. | '''...12...''' Enter a name for the printer. ''ILP'' might be a good suggestion. {{attachment:11.png}} '''...13...''' You probably want this to be your default printer so go ahead and check the box ''Set as the default printer''. You can also print out a test page to see if the printer is working as expected. Click ''Finish'' when you are done. {{attachment:12.png}} '''...14...''' Open the ''Devices and printers'' again. Find the printer you have just added in the list. Right click on the printer and select ''Printing preferences''. {{attachment:13.png}} '''...15...''' On the ''Printing Shortcuts'' tab please set the ''Print on both sides'' combo box to ''Yes, flip over''. The environment will be eternally grateful to you. {{attachment:14.png}} '''...16...''' On the ''Paper/Quality'' tab please check the box ''EconoMode''. Keep this setting in mind because you might want to change it whenever you are printing something fancy. {{attachment:15.png}} {{{#!wiki tip ilp stands for InfoLab Printer :) }}} |
Installing HP LaserJet 600 on Windows
This howto will show you how to set up our black/white printer on Windows 7 in only 16 very simple steps.
...1...
Grab the drivers from the link below and unzip them into a temporary folder on your computer.
...2...
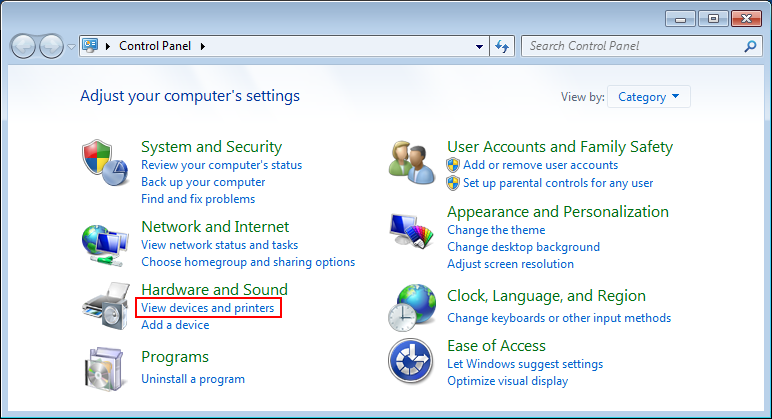
Open the Control Panel and click on the View devices and printers link. Or open Devices and Printers directly from what used to be called a start menu.
...3...
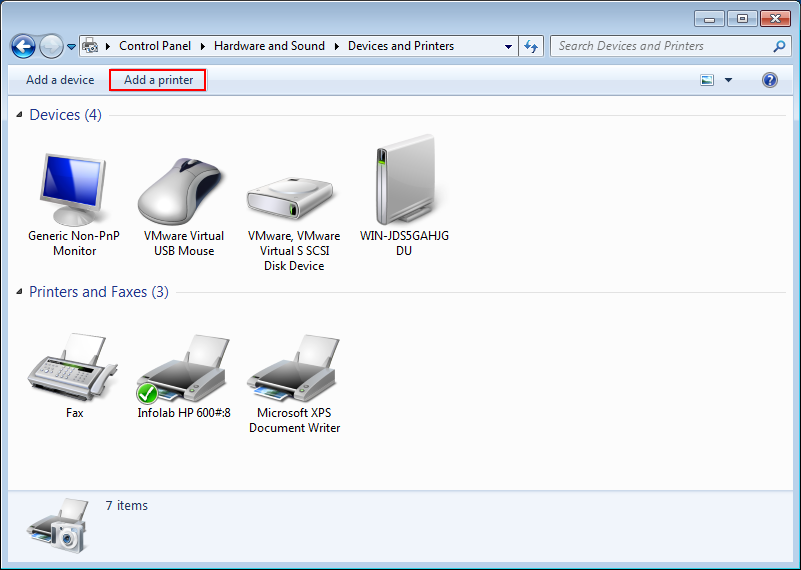
Click the Add a printer button.
...4...
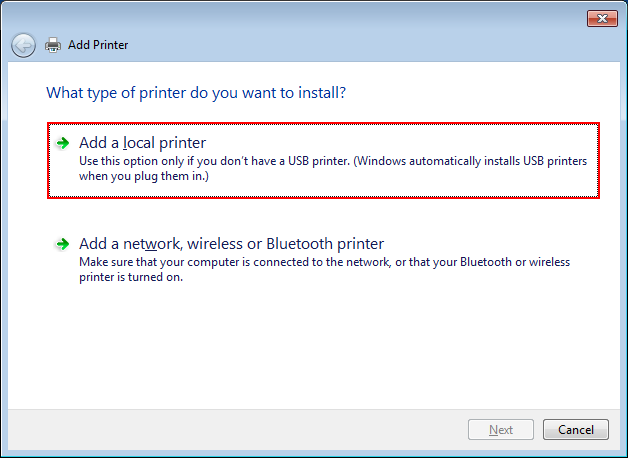
Select Add a local printer and click Next.
...5...
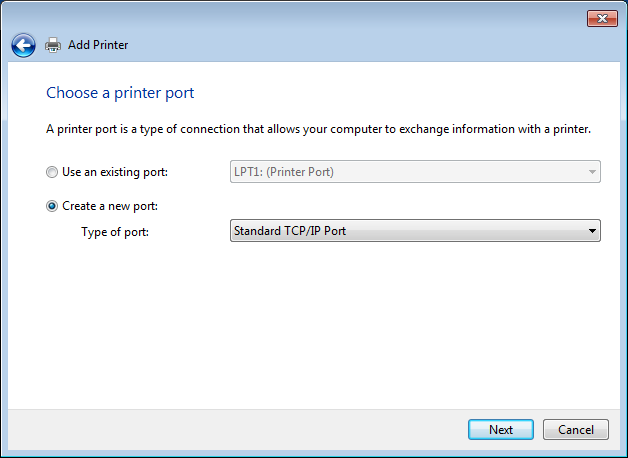
Select the option Create a new port. Choose Standard TCP/IP Port from the Type of port combo box.
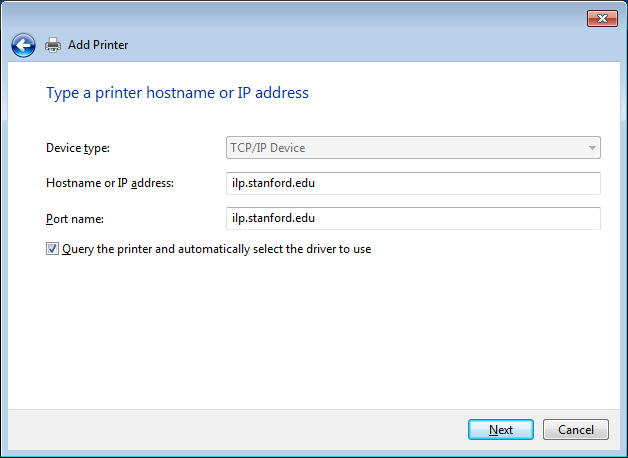
...6...
Enter ilp.stanford.edu in both the Hostname or IP address field and the Port name filed. Make sure the check box Query the printer automatically... is checked.
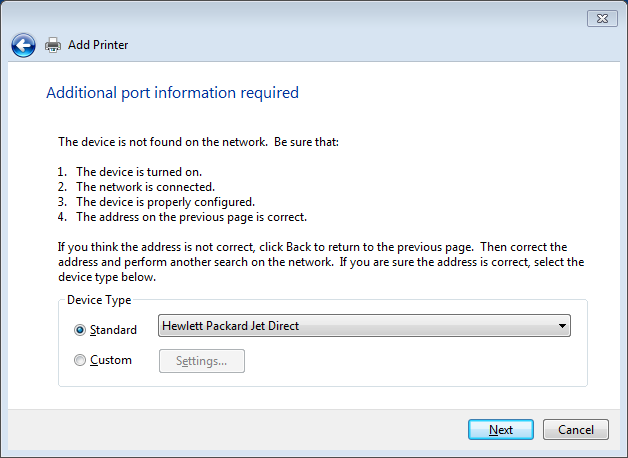
...7...
Select the option Standard for the Device Type and make sure that Hewlett Packard Jet Direct is selected in the combo box.
...8...
Click on the Have Disk... button. Click on the 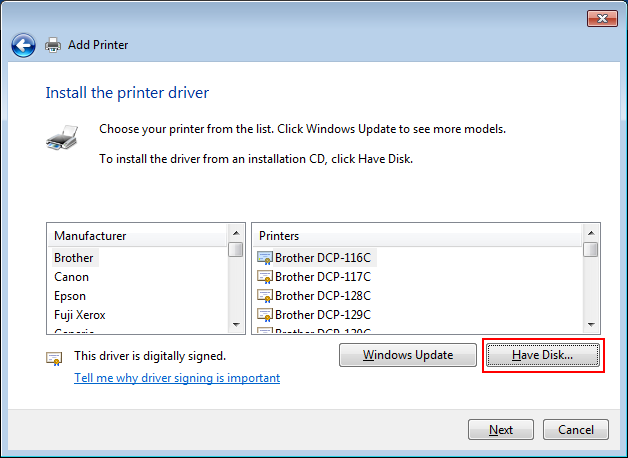
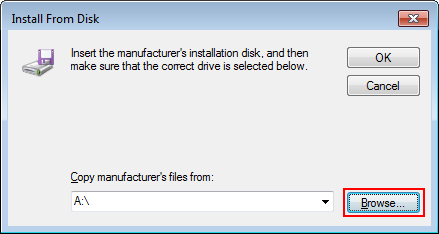
...10...
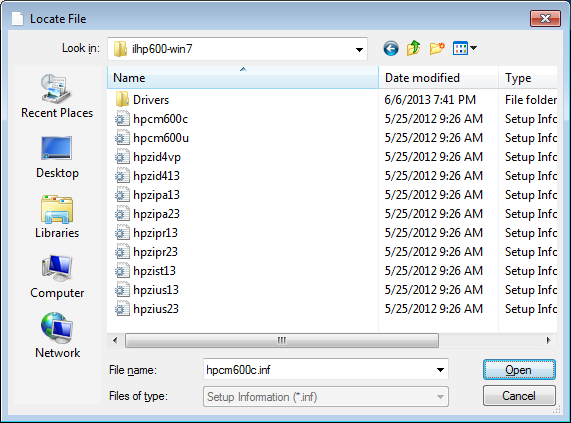
Navigate to the folder that you have unzipped the driver files to (#1) and click on the Open button.
...11...
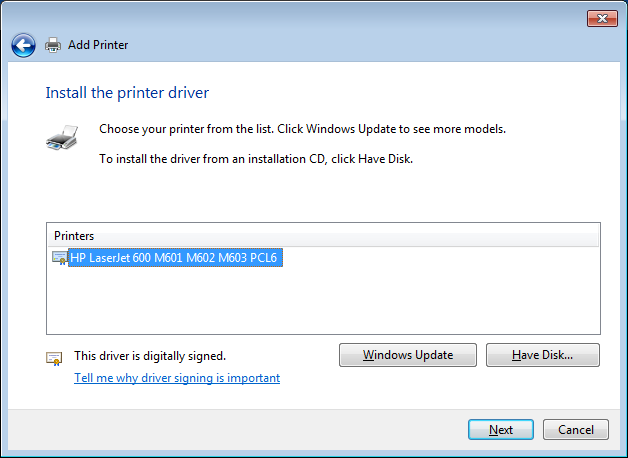
Select HP LaserJet 600 M601 M602 M603 PCL6 from the list and click Next.
...12...
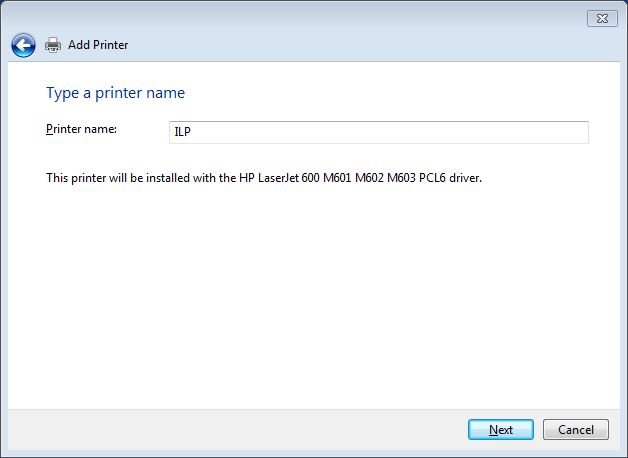
Enter a name for the printer. ILP might be a good suggestion.
...13...
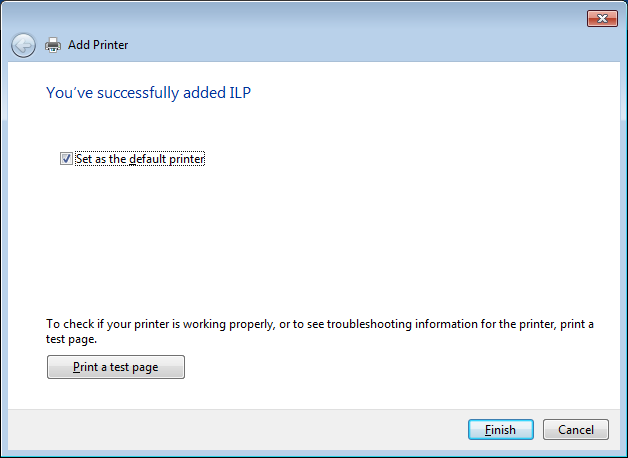
You probably want this to be your default printer so go ahead and check the box Set as the default printer. You can also print out a test page to see if the printer is working as expected. Click Finish when you are done.
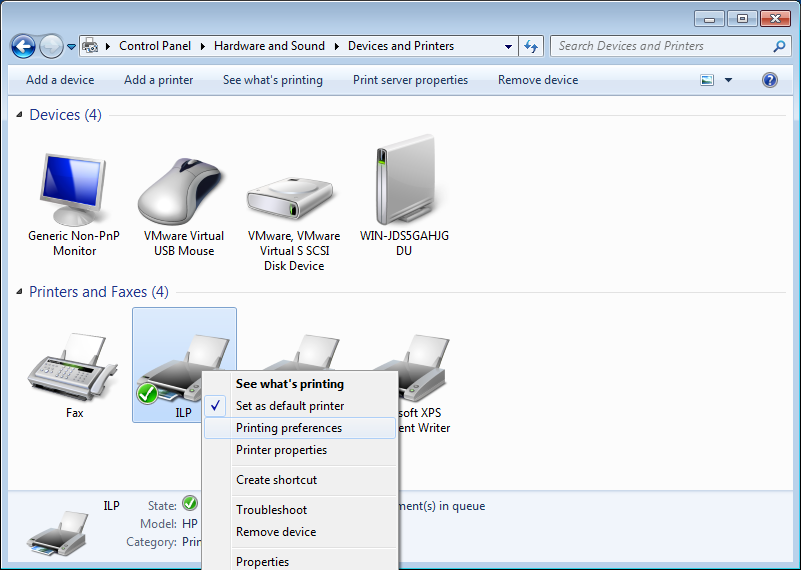
...14...
Open the Devices and printers again. Find the printer you have just added in the list. Right click on the printer and select Printing preferences.
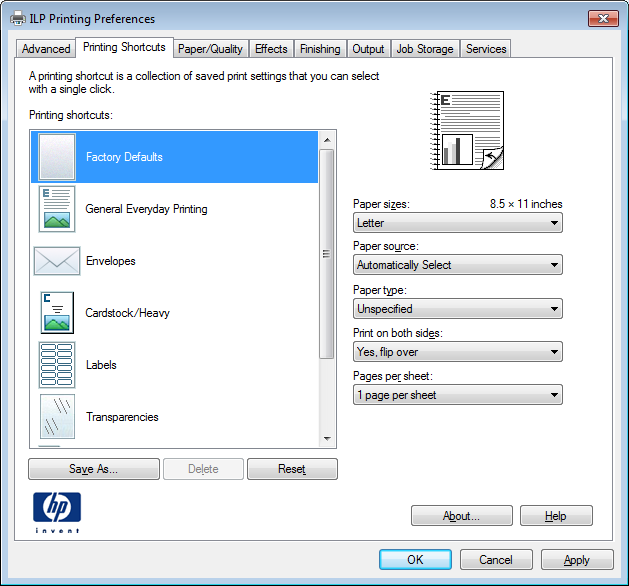
...15...
On the Printing Shortcuts tab please set the Print on both sides combo box to Yes, flip over. The environment will be eternally grateful to you.
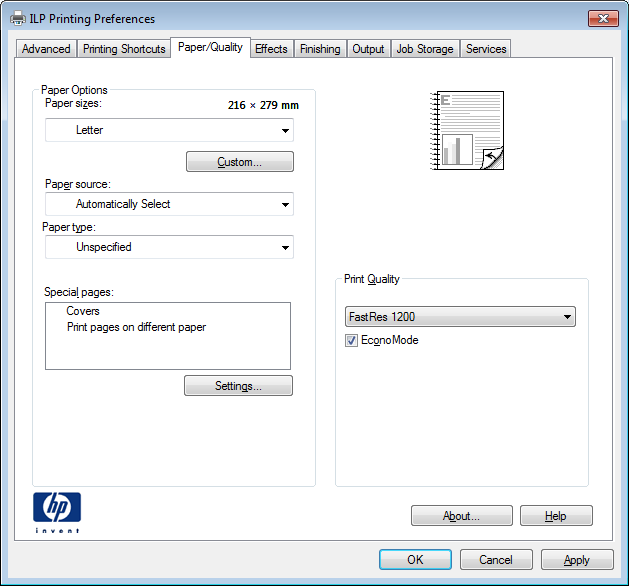
...16...
On the Paper/Quality tab please check the box EconoMode. Keep this setting in mind because you might want to change it whenever you are printing something fancy.
ilp stands for InfoLab Printer ![]()
 Infolab wiki